Response Builder
How to use the Response builder
The Response Builder in Mask API allows you to customize API responses, making it easy to restructure, rename fields, filter, and combine nested fields within the response data.
Key Features
- Dynamic Configuration: Modify response structure and content.
- Real-Time Updates: See changes instantly.
- User-Friendly Interface: Intuitive design for easy customization.
Getting Started
Accessing the Response Builder:
- Go to the API Studio section in the Mask API dashboard.
- Access on the Response Builder.
Configuring Responses:
- Add and Rename Fields: Modify field names and values.
- Data Transformation: Format and restructure data.
- Preview Changes: View live previews.
Examples
Example(1):
-
Original Response:
{ "msg": "user fetched successfully", "data": { "user": { "id": 1, "name": "John", "password": "123456" }, "age": "20", "location": "New York" } } -
Custom Response:
{ "message": "user fetched successfully", "user": { "id": 1, "name": "John", "age": "20", "city": "New York" } } -
Steps:
Note: We will assuming that you added the original URL and it method and the response of your original URL is the same original response above
- Add the first field which will be for the
msg:
- Add the first field which will be for the
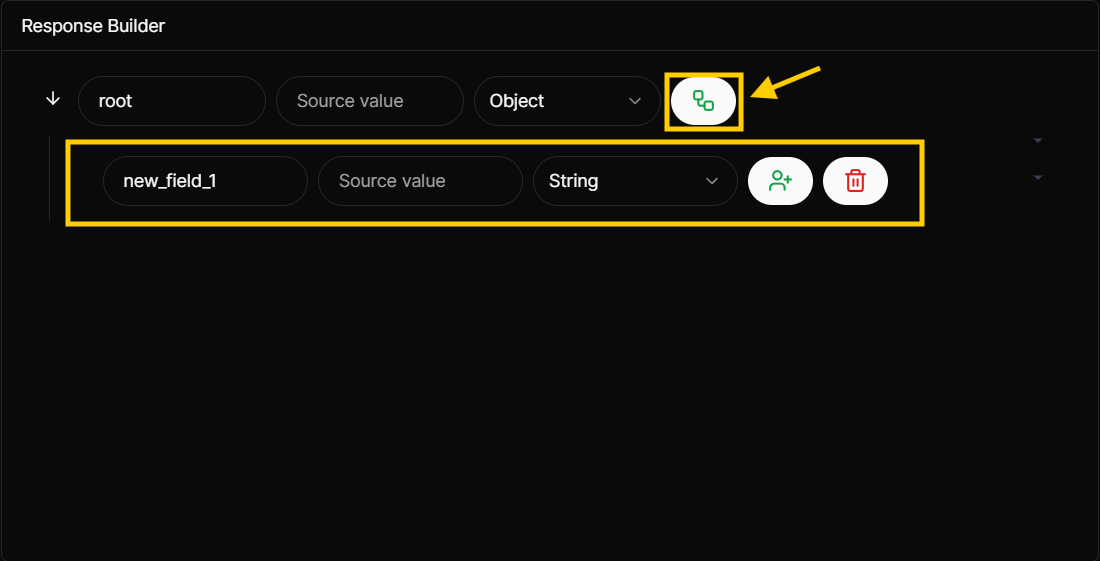
- Rename the first input with
messagewhich is the new field name and enter the field source value from the original response which is themsgand type of string:

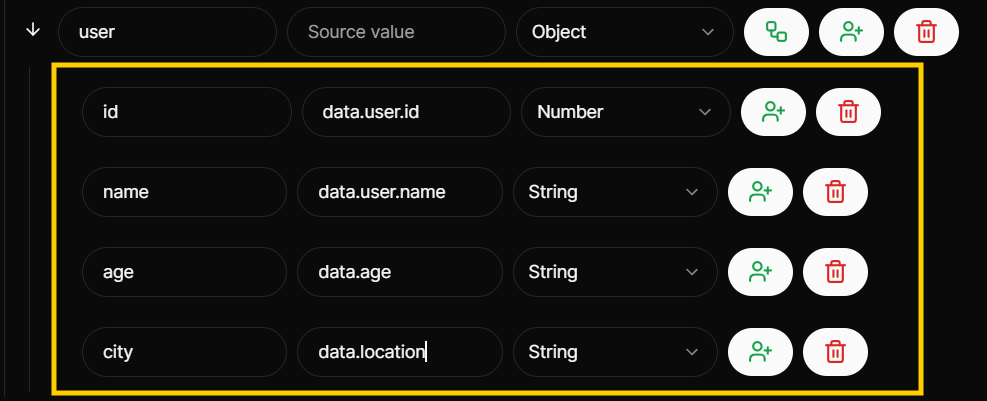
- Add the
userobject and its child fields (id,name,age,city) with sources values (data.user.id,data.user.name,data.age,data.location) and ignorepasswordunnecessary field:

This is the result of Original response,Custom response after clicking the Test button:

Explanation:
-
Adding Fields:
- Add a top-level field named
messagewith a type of string. - Add a top-level field named
userwith a type of object. - Under the
userfield, add child fields:id,name,age, andcity.
- Add a top-level field named
-
Entering Source Values:
- In the
messagefield, entermsgas the source value, corresponding to the original field name in the original response. - In the
idfield under theuserobject, enterdata.user.idas the source value, reflecting the nested structure in the original response. - In the
namefield under theuserobject, enterdata.user.nameas the source value, maintaining the original response hierarchy. - In the
agefield under theuserobject, enterdata.ageas the source value, accurately mapping the original response. - In the
cityfield under theuserobject, enterdata.locationas the source value, aligning with the original response structure.
- In the
-
Show Results:
- In every change you make in the response builder you can click "Test" button to show the results and see the different between the original response and your custom response.
Example(2) With Array:
- Original Response:
{
  "msg": "users fetched successfully",
  "data": {
    "data ":
    [
      {
        "user":{
          "id": 1,
          "name": "John"
          },
          "age": "20",
          "location": "New York"
          },
          {
        "user":{
          "id": 2,
          "name": "Hakeem"
          },
          "age": "21",
          "location": "LE"
          }
      ]
  }
}- Custom Response:
{
  "message": "users fetched successfully",
  "users": [
      {
      "id": 1,
      "name": "John",
      "age": "20",
      "city": "New York"
      },
      {
      "id": 1,
      "name": "John",
      "age": "20",
      "city": "New York"
      },
  ]
}-
Steps:
- Add the first field which will be for the
msg:

- Rename the first input with
messagewhich is the new field name and enter the field source value from the original response which is themsgand type of string:

-
Add the
usersfield with type of Array and source value ofdata.data:Note: when your choose the type array that will automatically generate child for the array field with name of items.
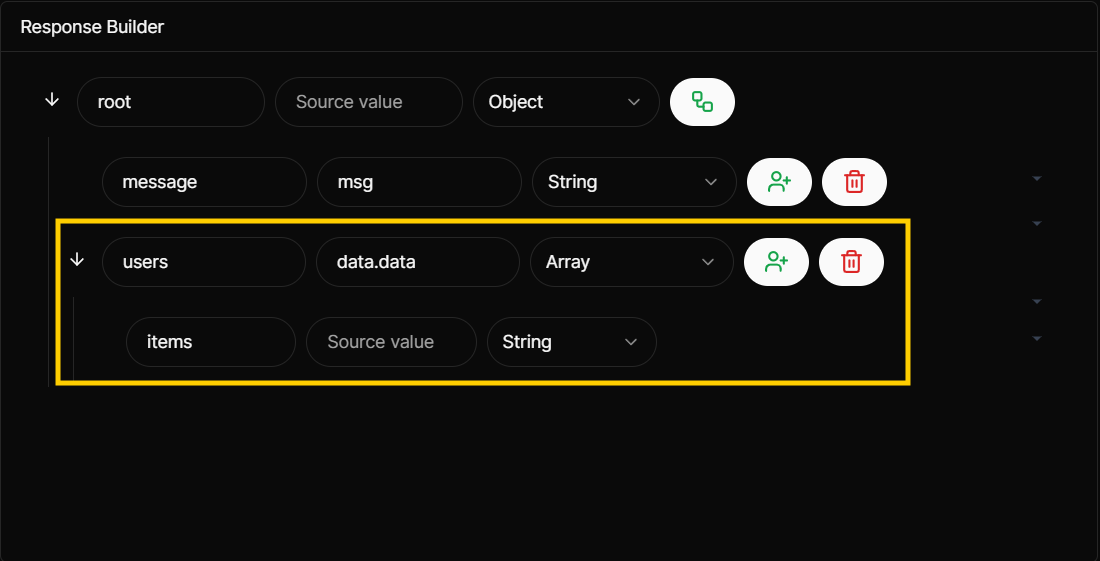
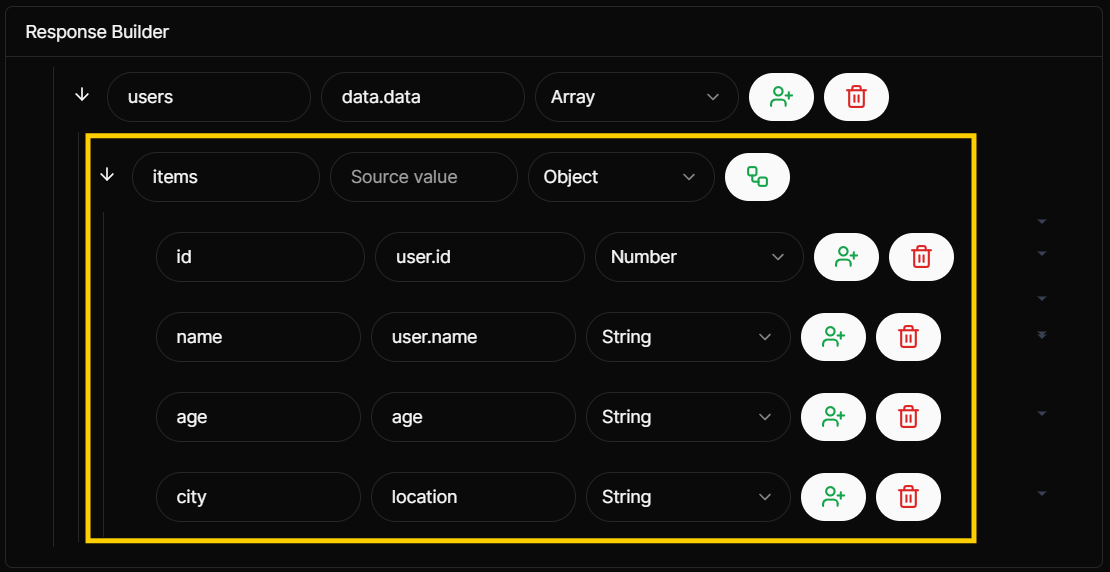
- change type of
itemsfield to object and add its child fields (id,name,age,city) with sources values (user.id,user.name,age,location)
This is the result of
Original response,Custom responseafter clicking theTestbutton: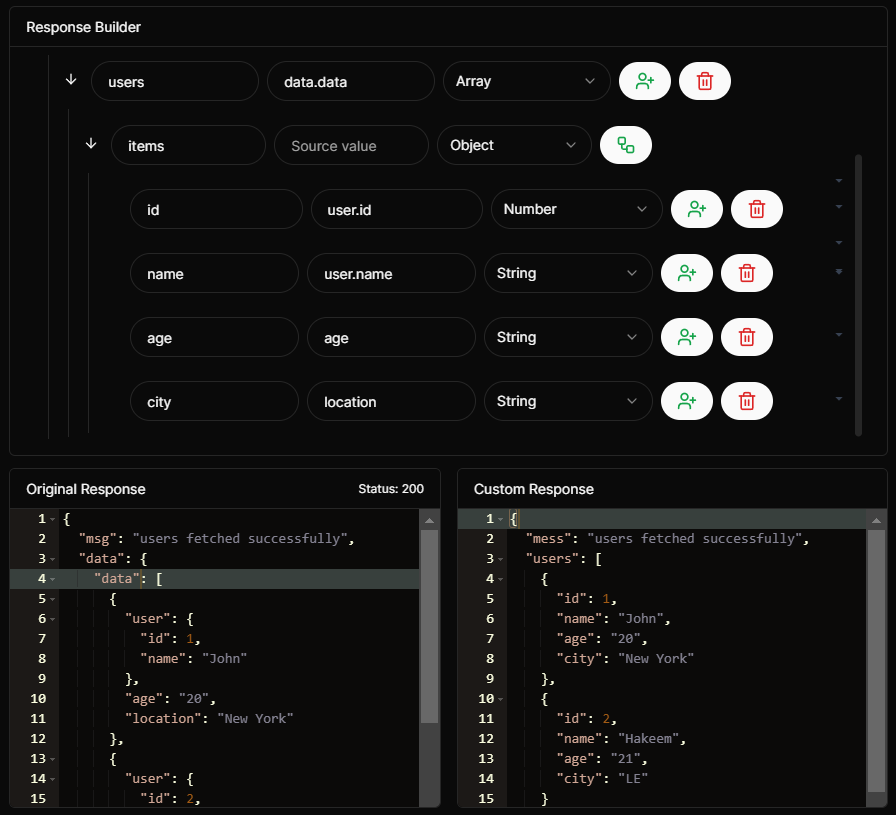
- Add the first field which will be for the
Explanation:
-
Adding Fields:
- Add a top-level field named
messagewith a type of string. - Add a top-level field named
userswith a type of array. This will automatically generate a child field nameditems. - Change the
itemsfield underusersto type object. - Under the
itemsobject, add child fields:id,name,age, andcity.
- Add a top-level field named
-
Entering Source Values:
- In the
messagefield, entermsgas the source value, corresponding to the original field name in original response. - In the
usersarray field, enterdata.dataas the source value so the child fields ofitemscan access the fields of thedataarray in the original response. - In the
idfield underitems, enteruser.idas the source value, aligning with the original response structure. - In the
namefield underitems, enteruser.nameas the source value, aligning with the original response structure. - In the
agefield underitems, enterageas the source value, aligning with the original response structure. - In the
cityfield underitems, enterlocationas the source value, aligning with the original response structure.
- In the
Note: The source values for the child fields of items are treated as if they are at the top level because data.data references the array directly in the original response. This allows the child fields to directly access and map the values from the array.
- Show Results:
- In every change you make in the response builder you can click "Test" button to show the results and see the different between the original response and your custom response.
Summary and Benefits
Using the Response Builder tool provides several key advantages:
- Improved Readability: Field names are more descriptive and intuitive, making the API response easier to understand.
- Enhanced Security: Sensitive data, such as passwords, can be easily removed to ensure user privacy.
- Consistent Structure: Organizing data into a clear and consistent format simplifies data handling and integration.
- Customization: Tailor API responses to fit specific needs without modifying the backend.
For more detailed instructions and examples, refer to the sections above.

